Quantcast
Viewing all 35 articles
Browse latest View live

Enhanced e-mail SPAM protection in ISPConfig 3

The command below enables a stricter SPAM handling for postfix on ISPConfig 3 servers.

In Detail:

  • Reject sender hostnames with invalid syntax
  • Reject sender hostnames that are no fully qualified domains (e.g. reject “server1″ but allow server1.domain.tld)
  • Reject sender domains that have no DNS records
  • Check sender IP addresses against realtime blacklists.

First make a backup of the postfix main.cf file in case that you want to reverse the changes later:

cp -pf /etc/postfix/main.cf /etc/postfix/main.cf.bak

Then execute this command to enable the additional spam protection functions (the command is one line!).

postconf -e ‘smtpd_recipient_restrictions = permit_mynetworks, permit_sasl_authenticated, reject_invalid_hostname, reject_non_fqdn_hostname, reject_unknown_recipient_domain, reject_non_fqdn_recipient, reject_unauth_destination, reject_non_fqdn_sender, reject_unknown_sender_domain, reject_unknown_recipient_domain, reject_rbl_client cbl.abuseat.org,reject_rbl_client dul.dnsbl.sorbs.net,reject_rbl_client ix.dnsbl.manitu.net, check_recipient_access mysql:/etc/postfix/mysql-virtual_recipient.cf, reject_unauth_destination’

Then restart postfix:

/etc/init.d/postfix restart


nginx server error: 413 Request Entity Too Large

The nginx webserver has a max. body size limit of 1 MB for requests as default. This might be too low for file uploads in scripts and you will see the following error message when you try to upload a file:

 413 Request Entity Too Large

The configuration variable for this option is “client_max_body_size” and it can be set in the http, server and location sections of the nginx configuration file. To set the Limit globally to 25 MB, edit the nginx.conf file and add:

client_max_body_size 20M;

in the http section.

Example for Ubuntu Linux:

user www-data;
worker_processes 4;
pid /var/run/nginx.pid;

events {
        worker_connections 768;
        # multi_accept on;
}

http {
        geoip_country  /etc/nginx/geoip/GeoIP.dat; # the country IP database
        geoip_city     /etc/nginx/geoip/GeoLiteCity.dat; # the city IP database
        ##
        # Basic Settings
        ##

        sendfile on;
        tcp_nopush on;
        tcp_nodelay on;
        keepalive_timeout 65;
        types_hash_max_size 2048;
        client_max_body_size 20M;

        include /etc/nginx/mime.types;
        default_type application/octet-stream;

        ##
        # Logging Settings
        ##

        access_log /var/log/nginx/access.log;
        error_log /var/log/nginx/error.log;

        ##
        # Gzip Settings
        ##

        gzip on;
        gzip_disable "msie6";

        ##
        # Virtual Host Configs
        ##

        include /etc/nginx/conf.d/*.conf;
        include /etc/nginx/sites-enabled/*;
}

Apache mod-security installation on Debian 6.0 (squeeze)

Install the apache mod-security 2 module with apt from the Debian repositories

apt-get install libapache-mod-security

Create the folder for the mod-security configuration files

mkdir /etc/apache2/mod-security
chmod 600 /etc/apache2/mod-security

Download and unpack the mod-security rules

cd /tmp
wget http://www.modsecurity.org/download/modsecurity-core-rules_2.5-1.6.1.tar.gz
tar fvx modsecurity-core-rules_2.5-1.6.1.tar.gz
mv *.conf /etc/apache2/mod-security/
ln -s /var/log/apache2 /etc/apache2/logs

Configure apache to load the activated mod-security rules

vi /etc/apache2/conf.d/mod-security.conf

Include /etc/apache2/mod-security/*.conf

To enable mod-security, edit the file

vi /etc/apache2/mod-security/modsecurity_crs_10_config.conf

and remove the # in front of the line:

SecDefaultAction “phase:2,log,deny,status:403,t:lowercase,t:replaceNulls,t:compressWhitespace”

Then reload apache.

/etc/init.d/apache2 force-reload

Mod security will now start to block hack attempts to your websites and log the actions in the file /var/log/apache2/modsec_audit.log.

tail /var/log/apache2/modsec_audit.log

You will see very likely some falsely blocked URL’s. To whitelist them, you can add the ID’s of the rules that should not be used in the whitelist file.

Example:

vi /etc/apache2/mod-security/modsecurity_crs_99_whitelist.conf

SecRuleRemoveById 960015
SecRuleRemoveById 960016

Debugging of ISPConfig 3 server actions in case of a failure

The follwing article describes the steps that can be taken to debug the ISPConfig 3 server scripts.

Enable the debug Loglevel in ISPConfig

Login to the ISPConfig intterface and set the log level to Debug under System > System > Server Config (see also chapter 4.9.2.2 of the ISPConfig 3 manual) for the affected server. After one or two minutes, there should be more detailed messages in ISPConfig’s system log (Monitor > System State (All Servers) > Show System-Log).

Disable the server.sh cronjob

Go to the command line of the server on which the error happens (on multiserver systems, it is often the slave and not the master) and run (as root):

crontab -e

Comment out the server.sh cron job:

#* * * * * /usr/local/ispconfig/server/server.sh > /dev/null >> /var/log/ispconfig/cron.log

Run the server script manually to get detailed debug output

Then run the command:

/usr/local/ispconfig/server/server.sh

This will display any errors directly on the command line which should help you to fix the error. If you have fixed
the error, please don’t forget to uncomment the server.sh cron job again.

Fix “HTTP request length 134926 (so far) exceeds MaxRequestLen” error on Debian Linux

If you get a 500 error in a webpage hosted on Debian Linux (6.0) with apache webserver and fastcgi, take a look into the apache error.log file. This can either be the global error.log or the error.log of the website where you got the error. If you find a error similar to this one:

[Fri Apr 10 15:18:05 2012] [warn] [client 192.168.0.55] mod_fcgid: HTTP request length 134926 (so far) exceeds MaxRequestLen (131072), referer: http://www.example.tld/administrator/index.php?option=com_installer

then the MaxRequestLen setting of mod_fccgid is too low. To fix that, edit the file /etc/apache2/mods-available/fcgid.conf

vi /etc/apache2/mods-available/fcgid.conf

and add or edit the line “MaxRequestLen 15728640″ to set the Request Limit to 15MB. The resulting file should contain these settings:

AddHandler fcgid-script .fcgi
FcgidConnectTimeout 20
MaxRequestLen 15728640

Save the changes and restart apache:

/etc/init.d/apache2 restart

Change of mail header form field identifier from ISPConfig 2 to ISPConfig 3

If you have a local mail server installed and change your server controlpanel to ISPConfig 3, having used ISPConfig 2 in the past, you may have to change the value that defines the form field observed by all functions in need of the address that mails are supposed to be delivered to (catchalls, etc.) on your mail server preferences since the identifier has changed from X-Delivered-To to Delivered-To in ISPConfig 3; otherwise the system won’t be able to find the necessary information in the mails’ headers.

Image may be NSFW.
Clik here to view.

Restart the server afterwards and you should find it working again.

Thanks to Alexander Fox for this post!

Setting up email routing to gmail / google apps via ISPConfig 3

The following guide describes the steps to add DNS records that route emails from a domain managed in ISPConfig 3 to google apps / gmail. The guide assumes that you have already setup the dns zone for your domain in ispconfig.

Login to ISPConfig, click on the DNS module icon in the upper navigation bar, then open the settings of the DNS zone that you want to redirect to google and click on the “records” tab. You should see a record list similar to this:

Image may be NSFW.
Clik here to view.

Now Delete the existing MX record and the “mail” A-Record. Then add the following new records:

CNAME Record:

Hostname: mail
Target: ghs.google.com.

MX Records:

example.com. ASPMX.L.GOOGLE.COM. 10
example.com. ALT1.ASPMX.L.GOOGLE.COM. 20
example.com. ALT2.ASPMX.L.GOOGLE.COM. 30
example.com. ASPMX2.GOOGLEMAIL.COM. 40
example.com. ASPMX3.GOOGLEMAIL.COM. 50

IMPORTANT: All full domain names like “ghs.google.com.” have to end with a dot, if the dot is missing, the name is treated as subdomain of the zone.

The resulting record list should look like this:

Image may be NSFW.
Clik here to view.

How to disable MySQL replication on master/master andmaster/slave setups

The following guide shows how to disable and remove mysql replication from two or more mysql servers. These steps can be used for master/slave and master/master mysql setups. The following SQL commands have to be be executed in phpmyadmin or with the mysql commandline program. It is just important that you are logged in as mysql root user. Below I will use the mysql commandline client.

Login into mysql as root user from commandline:

mysql -u root -p

the mysql command will ask for the mysql root password.

Then execute these commands if the installed mysql version is < 5.5.16:

STOP SLAVE;
RESET SLAVE;
QUIT

use the commands below instead if the mysql version is > 5.5.16

STOP SLAVE;
RESET SLAVE ALL;
QUIT

Now edit the my.cnf file (/etc/mysql/my.cnf) and add a # in front of all lines that start with “replicate-” or “master-”. Example:

# replicate-same-server-id = 0
# master-host = 192.168.0.105
# master-user = slaveuser
# master-password = akst6Wqcz2B
# master-connect-retry = 60

Then restart mysql:

/etc/init.d/mysql restart


Apache mod_security settings for WordPress and ModX

If you use the apache mod_security module on your apache server, you might encounter wrong 403 errors for several URL’s of the cms systems. Here are some exception rules to avoid that:

For WordPress Blogs

<locationmatch "/wp-admin/admin-ajax.php">
SecRuleRemoveById 300013
SecRuleRemoveById 300015
SecRuleRemoveById 300016
SecRuleRemoveById 300017
</locationmatch>

<locationmatch “/wp-admin/page.php”>
SecRuleRemoveById 300013
SecRuleRemoveById 300015
SecRuleRemoveById 300016
SecRuleRemoveById 300017
</locationmatch>

<locationmatch “/wp-admin/post.php”>
SecRuleRemoveById 300013
SecRuleRemoveById 300015
SecRuleRemoveById 300016
SecRuleRemoveById 300017
</locationmatch>

For the ModX CMS

<LocationMatch "/manager/index.php">
SecRuleRemoveById 300016
</LocationMatch>

<LocationMatch “/connectors/resource/index.php”>
SecRuleRemoveById 300013 300014 300015 300016
</LocationMatch>

<LocationMatch “/connectors/element/tv.php”>
SecRuleRemoveById 300013 300016
</LocationMatch>

Add these rules inside the vhost file of the website. If you use ISPConfig to manage the server, then add the rules in the apache directives field of the website settings in ispconfig.

Many thanks to PlanetFox for providing the rules.

Solution for amavisd error – TROUBLE in process_request: Error writing a SMTP response to the socket: Broken pipe – on OpenVZ server

If you get error messages from amavisd similar to the one posted below on a server which is virtualized with OpenVZ:

Mar  5 09:09:02 v100 amavis[17378]: (17378-14) (!!)TROUBLE in process_request: Error writing a SMTP response to the socket: Broken pipe at (eval 100) line 987, <GEN44> line 31.

then the issue can be caused by the NUMTCPSOCK value in the openvz limits. Even if the barrier of this limit was never met in /proc/user_beancounters, the above error occurs when more then 25% of all TCP sockets were used. The solution is to set the NUMTCPSOCK barrier and limit to a high value in the openvz container configuration file. Here a value that worked for me on a moderately used mailserver:

NUMTCPSOCK=”2000:2000″

Finally restart the OpenVZ VM to apply the new limit value.


Solution for dovecot error: /path/ is no longer mounted. If this is intentional, remove it with doveadm mount

Dovecot is watching the whole server filesystem for modifications and removed or added sub filesystems. If you get errors similar to this one on your server:

Aug 30 09:10:23 server1 dovecot: master: Warning: /var/www/clients/client1/web1/log is no longer mounted. If this is intentional, remove it with doveadm mount

 (the directory path may vary), then you can fix it by excluding the path from being watched by dovecot. In my case, dovecot shall not watch my website directories as they do not contain any mailboxes

Run the following command on the shell as root user:

doveadm mount add ‘/var/www/*’ ignore

To exclude all files and folders in /var/www from deovecot monitoring.


Solution for: fatal: open database /var/lib/postfix/smtpd_scache.db: File exists

If your mail server stops working (neither incoming nor outgoing email works) and you find the following error message in the mail.log file:

fatal: open database /var/lib/postfix/smtpd_scache.db: File exists

then the smtpd_scache.db might got corrupted. Postfix will recreate this file, if it does not exist. So it can be removed to solve the issue:

/etc/init.d/postfix stop
rm -f /var/lib/postfix/smtpd_scache.db
/etc/init.d/postfix start

Thanks to Alexander Fox for sending me this FAQ.

How To Disable Error Logging For A Website In ISPConfig 3

To disable the error.log for a website in ISPConfig on a Apache webserver, follow this steps:

1) Login to ISPConfig

2) Go to the website settings of the website were you like to disable the error.log and there go to the "Options tab"

3) Add the following line in the field labeled "Apache Directives"

ErrorLog /dev/null

and press save:


Which ports are used on a ISPConfig 3 server and shall be open in the firewall?

Here is a list of ports that are used commonly on ISPConfig 3 servers. If you dont have all services installed or if you e.g. dont want to connect to MySQL from external servers, then close the unused or unwanted ports.

TCP ports

20 - FTP Data
21 - FTP Command
22 - SSH
25 - Email
53 - DNS
80 - HTTP (Webserver)
110 - POP3 (Email)
143 -Imap (Email)
443 - HTTPS (Secure webserver)
993 - IMAPS (Secure Imap)
995 - POP3S (Secure POP§)
3306 - MySQL Database server
8080 - ISPConfig web interface
8081- ISPConfig apps vhost

UDP ports

53 - DNS
3306 - MySQL

How to add PHP support for jailed SSH users in ISPConfig 3

Jailkit is an easy to use tool to create and maintain jail environments for shell users on Linux. In this guide, I will show you how to move PHP and its dependencies into the jail so that the jailed user can execute PHP scripts inside the jail.

Edit the jailkit .ini file and add a section for PHP at the end of the file

Open the jk_init.ini file with an editor:

nano /etc/jailkit/jk_init.ini

and paste the following lines at the end of the file:

[php]
comment = the php interpreter and libraries
executables = /usr/bin/php5
directories = /usr/lib/php5, /usr/share/php, /usr/share/php5, /etc/php5, /usr/share/php-geshi, [B]/usr/share/zoneinfo[/B]
includesections = env

[env]
comment = environment variables
executables = /usr/bin/env

Then run the command:

jk_init -c /etc/jailkit/jk_init.ini -f -k -j /var/www/clients/client1/web1 php

To install PHP and it's dependencies into the jail.

Add PHP for all newly jailed shell users

To add PHP for all newly jailed shell users that you add in ISPConfig, follow these steps:

  1. Login to ISPConfig and go to System > Server Config
  2. Select the server and go to the jailkit tab.
  3. Add the word "PHP" separated by a white space at the end of the "Jailkit chroot app sections" field and press save.

Image may be NSFW.
Clik here to view.
ispconfig_jailkit

The post How to add PHP support for jailed SSH users in ISPConfig 3 appeared first on FAQforge.


Enable image caching in apache for better Google Page Speed results

High page speed and short page load times of your website are essential for good search engine rankings today. In this FAQ, I will show you how to enable caching of graphic and CSS files in apache on Ubuntu and Debian.

The first step is to enable the expires module in apache:

a2enmod headers expires

This module allows the apache web server to set HTTP headers, in this case, to set the modification header for static assets like image and CSS files that don't change often.

Add the following config snippet inside the vhost file of the web site or at the end of the file /etc/apache2/apache2.conf to enable it globally.

<FilesMatch "\.(ico|pdf|flv|jpg|jpeg|png|gif|js|css|swf)$">
Header set Cache-Control "max-age=3024000, public"
</FilesMatch>

Finally reload apache to apply the configuration change.

service apache2 reload

On ISPConfig 3 servers, the snippet can be added in the "Apache Directives" field of the website instead. There is no apache reload required as ISPConfig takes care about that.

The post Enable image caching in apache for better Google Page Speed results appeared first on FAQforge.

How to renew the ISPConfig 3 SSL Certificate

This tutorial describes the steps to renew the SSL Certificate of the ISPConfig 3 control panel. There are two alternative ways to achieve that:

  1. Create a new OpenSSL Certificate and CSR on the command line with OpenSSL.
  2. Renew the SSL Certificate with the ISPConfig updater

I'll start with the manual way to renew the ssl cert.

1) Create a new ISPConfig 3 SSL Certificate with OpenSSL

Login to your server on the shell as root user. Before we create a new SSL Cert, backup the current ones. SSL Certs are security sensitive so I'll store the backup in the /root/ folder.

tar pcfz /root/ispconfig_ssl_backup.tar.gz /usr/local/ispconfig/interface/ssl
chmod 600 /root/ispconfig_ssl_backup.tar.gz

Now create a new SSL Certificate key, Certificate Request (csr) and a self signed Certificate.

openssl genrsa -des3 -out ispserver.key 4096
openssl req -new -key ispserver.key -out ispserver.csr
openssl x509 -req -days 3650 -in ispserver.csr \
-signkey ispserver.key -out ispserver.crt
openssl rsa -in ispserver.key -out ispserver.key.insecure
mv ispserver.key ispserver.key.secure
mv ispserver.key.insecure ispserver.key

Restart Apache to load the new SSL Certificate.

service apache2 restart

2) Renew the SSL Certificate with the ISPConfig installer

The alternative way to get a new SSL Certificate is to use the ISPConfig update script.
 

Download ISPConfig to the /tmp folder, unpack the archive and start the update script.

cd /tmp
wget http://www.ispconfig.org/downloads/ISPConfig-3-stable.tar.gz
tar xvfz ISPConfig-3-stable.tar.gz
cd ispconfig3_install/install
php -q update.php

The update script will ask the following question during update:

Create new ISPConfig SSL certificate (yes,no) [no]:

Answer "yes" here and the SSL Certificate creation dialog will start.

The post How to renew the ISPConfig 3 SSL Certificate appeared first on FAQforge.

How to create a custom invoice template in ISPConfig 3 Billing Module

This tutorial shows how you can build your own custom template for the PDF invoices in the ISPConfig billing module. The custom template will be update-safe, so you don't have to worry that your modifications will vanish on ISPConfig or Billing Module update.

What we will do

I will create a new custom template with the name "mycompany" and set this template as the default template for new invoices, proforma invoices and credit notes.

The Basics

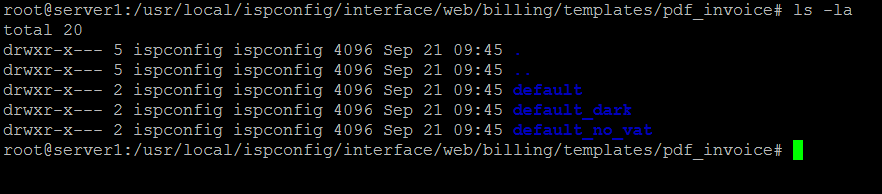
The templates for the PDF files that get created by the ISPConfig Billing Module are in the folder:

/usr/local/ispconfig/interface/web/billing/templates/pdf_invoice

Each template has it's own folder, the folder name is the name of the template. Please note that the folder name has to be in lowercase letters and it may not contain whitespaces. Instead of a whitespace, you can use an underscore "_" in the folder name.

Here is a screenshot how the folder with the default templates looks like.

Image may be NSFW.
Clik here to view.

The structure of the files in these folders is always the same. I'll show it below for the default template.

Image may be NSFW.
Clik here to view.

The file invoice.conf.php contains the base settings of the invoice like fonts, background color, and column widths. The file make_pdf_invoice.php is the actual PDF template, it contains the code that creates the invoice. The file test.php can be used to test the invoice. In that file, you can set the ID of an invoice that shall be rendered directly in the browser.

Create a custom invoice template in ISPConfig Billing Module

Let's get started with the new invoice template. I will use the "default" template as the basis.

Make a copy of the default template and name it "mycompany".

cp -prf /usr/local/ispconfig/interface/web/billing/templates/pdf_invoice/default /usr/local/ispconfig/interface/web/billing/templates/pdf_invoice/mycompany

Then go to the new folder:

cd /usr/local/ispconfig/interface/web/billing/templates/pdf_invoice/mycompany

and edit the make_pdf_invoice.php file.

nano make_pdf_invoice.php

Near the top of the file, you will find this line:

class PDFInvoice_default extends tFPDF

The word default in that line refers to the name of the invoice template. Change the line to:

class PDFInvoice_mycompany extends tFPDF

so that the name matches the on that you have chosen for your template.

Next, open the test.php file:

nano test.php

Set the ID of the invoice that you like to render for test purposes in line 11. The ID refers to the column invoice_id of the database table invoice in the ISPConfig database. In line 20, exchange the word default with the name of your invoice template. In case of this example, the line will be like this:

$pdf = new PDFInvoice_mycompany();

Activate the invoice template in ISPConfig

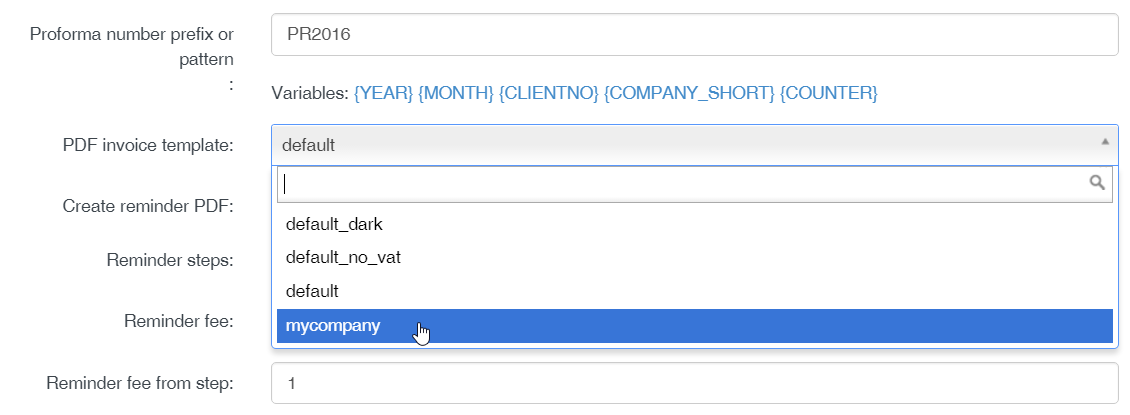
Login to ISPConfig as admin user, go to the billing module. There you click on Settings > Company in the left menu to edit the company details. Select your custom invoice template in the PDF invoice template field:

Image may be NSFW.
Clik here to view.

Now you can start making adjustments in the:

/usr/local/ispconfig/interface/web/billing/templates/pdf_invoice/mycompany/make_pdf_invoice.php

file to customize the invoice. The code in this file is commented, so you should easily find the places where you can adjust headline, address field etc. in your template.

Testing

There are several ways to test your new template. One way is that you open the details of an existing invoice (or create a new one) and press the "Save and finalize" button, this will create a new invoice based on your custom template. Then click on the PDF download icon to download or view it.

This procedure might become a bit annoying when you want to do extensive edits. That's why we made the test.php file for. Login to ISPConfig as admin.

To use test.php, login to ISPConfig as admin user (test.php will not work without login), then modify the URL in the browser to point to the test file. Example:

https://server1.example.com:8080/billing/templates/pdf_invoice/mycompany/test.php

and press return. The invoice with the ID that you configured in the test.php file will get rendered with your new template directly in the browser. Just press reload after editing the make_pdf_invoice.php file the latest changes you made in the template.


The post How to create a custom invoice template in ISPConfig 3 Billing Module appeared first on FAQforge.

RoundCube error: config.inc.php was not found.

This tutorial shows you how to solve the RoundCube webmail error message:

config.inc.php was not found.

on an ISPConfig Debian server that uses Nginx as the web server.

Solution

RoundCube webmail is accessed on an ISPConfig Nginx web server through the apps vhost. The PHP-FPM of the apps vhost is running under the user and group ispapps. To fix the above error you'll have to change the owner of some RoundCube files.

Run these commands as root user to apply the changes.

chown root:ispapps /etc/roundcube/debian-db.php
chmod 640 /etc/roundcube/debian-db.php
chown root:ispapps /etc/roundcube/config.inc.php
chmod 640 /etc/roundcube/config.inc.php
chown -R ispapps:adm /var/log/roundcube
chmod -R 750 /var/log/roundcube
chown -R ispapps:ispapps /var/lib/roundcube/temp
chmod -R 750 /var/lib/roundcube/temp

The post RoundCube error: config.inc.php was not found. appeared first on FAQforge.

How to change DNSSEC Algorithm in ISPConfig 3

This tutorial explains how to change your DNSSEC algorithm for a DNS zone managed by ISPConfig 3.

In this case, the current algorithm is 7 (NSEC3RSASHA1), and we will be moving to algorithm 13 (ECDSAP256SHA256)

Log in to the panel and open the settings for the zone. Enable the new algorithm, but DON'T disable the current algorithm yet.

When the new keys are generated, you can find them in the box "DNSSEC DS-Data for registry". You will see both the keys for your old, and for your new algorithm. It will look something like this:
; This is a zone-signing key, keyid 6417, for example.com.
; Created: 20200812004704 (Wed Aug 12 02:47:04 2020)
; Publish: 20200812004704 (Wed Aug 12 02:47:04 2020)
; Activate: 20200812004704 (Wed Aug 12 02:47:04 2020)
example.com. IN DNSKEY 256 3 13 DBOqv9nfRRmR7WoDH6WVSWra2gHkFF9gdvsVyDoyfv2D3oV3pGa2TAqw JMyLIrrB/LqyEnhowR3r9pWNISpbpw==

In this example, the keyid is 6417, it's the ZSK (256), and the algorithm is 13.

Copy both the new zone-signing key and key-signing key to your registry, and fill in the necessary fields (ZSK/KSK, keyid, algorithm).

After adding these keys, wait for the changes to propagate. You can monitor this with https://dnsviz.net.

When the changes are propagated (this will probably take 4 to 24 hours), you can remove the old keys from your registry. Wait for these changes to propagate again. When this is propagated, you can disable the algorithm in the ISPConfig interface.

Many thanks to Th0m for writing this tutorial.

The post How to change DNSSEC Algorithm in ISPConfig 3 appeared first on FAQforge.

Viewing all 35 articles
Browse latest View live